I just got back from my mother-in-law's 95th birthday. It was a great party. We saw a lot of family we don't get to see often, we ate too much, and nobody got hurt. Excellent.
Being the son-in-law, I didn't have much of a role in this shindig. I was in charge of the playlist, and that took about ten minutes. I wanted another job. So when my sister-in-law asked if I would be "the photographer," my eyes lit up. I said yes, but I told her I had an idea, and if I was in charge, we were doing it my way. That's the price you pay. She agreed. Silly girl.
The Idea
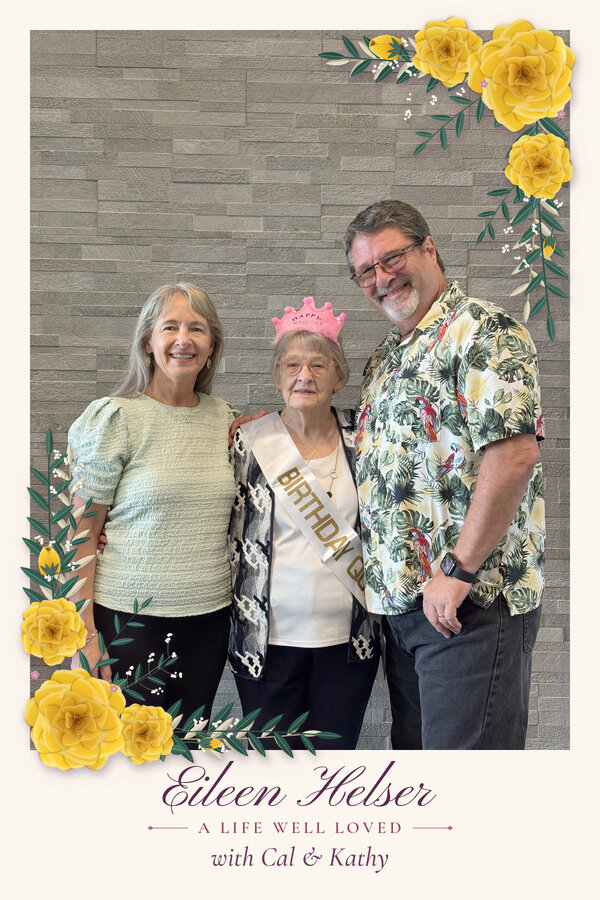
So off to Claude I went. I didn't want a pile of photos that nobody would ever look at again. I wanted everyone to leave with something in their hand. After a few minutes of brainstorming, he and I came up with a small photo booth. Not the usual goofy props and silly faces. Each guest or couple gets their picture taken with the birthday girl, and everyone walks out with a framed 4x6 print of that moment, their names printed right on it.
The card carries the party's theme, "A Life Well Loved," with cascading yellow roses in the top right and bottom left corners, and the guest of honor's name in script across the bottom, with the guests' names under the tagline. Here's one of me, Kathy, and the birthday girl herself, Eileen.
I started to get excited.
Night 1: The Plan
The first night we laid out the whole thing. I had already settled on the hardware, so I knew I had what I needed. What I still needed was a plan for the pieces:
- A camera
- A way to get the photo from the camera to a computer
- A computer to catch the incoming image and do the work
- A way to attach the guests' names to the picture
- A way to wrap the picture in a border, put the names on the border, and send it to the printer
- A printer
- A local network I could count on, because the party was at a venue with no internet I could depend on, and every device had to talk to every other device
Claude's agents reviewed the plan, poked holes in it, and wrote it all out for me. Then I turned him loose and went to bed. By morning the software was built, unit tested, and ready to go. All I had to do was stand up a server and string everything together.
That was about two hours of my evening. I'm serious.
Night 2: Making It Real
For the server I picked a Raspberry Pi 5 I had lying around. (Doesn't everyone?) It's overkill for this job, but it was handy. I imaged the card and ran the provisioning script Claude had written to install everything the Pi needed. It worked the first time. Very cool.
The network could have been a problem. Most public networks, hotels and venues included, isolate devices so they can't see each other. But I carry a travel router on trips. Every device I own connects to it, and it connects to whatever network the hotel offers. Because it's my private network, my devices can all see each other, which is exactly what this project needed. The photo booth never touched the internet at the party.
NOTE: I put very little thought into security for this project, because it was a family gathering. If you plan to run this anywhere bad actors might want to cause mischief (like if @caseysoftware is going to be there), I strongly suggest you harden it.
Once the server was up, it was a matter of connecting everything to the router and running a few tests.
The camera was my iPhone 15 Pro Max. Not state of the art, but plenty good for this. Claude also built me an iPhone Shortcut that reprograms the Action button on the side of the phone to upload new photos to the server. Press the button, the photos go. That worked great once I got it on the phone, and there are two ways to do that:
- Type it in by hand on the phone. This is excruciatingly difficult.
- Sign the generated Shortcut on a Mac and AirDrop it to the phone. My company gives me a Mac for work, so this was SO much easier.
The flow at the party looked like this:
- I take the picture.
- I press the Action button and the photo uploads to the server.
- On the iPad, wife 1.42 sees the photo appear on the web page.
- She taps it and types in the names of the people in the picture.
- When she's happy, she hits print.
- The printer produces the framed card.
One thing I didn't see coming: each print takes 90 to 120 seconds. We did fewer than 20 of them, so it was never an issue. If you plan to use this for a big crowd, plan for that. You'll want a second printer or a smaller guest list.
How It Went
It worked. Everybody loved their keepsake, a lot of people stopped me just to say thank you for such a special momento. Also, I got to contribute to the party in a way that nobody else could. I had fun. That matters.
What Actually Happened Here
Think about what this would have taken even six months ago. A web app, an image pipeline, a print queue, a phone integration, a network setup, and a server provisioning script, all working together on hardware I'd never combined. That's a month of planning and code, if I'm honest. And honestly, I probably wouldn't have started.
Instead it took two nights, about two hours each. Something that would have been impossible for a guy with a day job a few months ago was a weeknight project. That is cool, and it's a little bit scary. Mostly cool.
The code is yours. Here it is: https://gitlab.com/calevans/photo-booth
Thanks to wife 1.42 for running the iPad and the print queue like a pro, and to my sister-in-law for handing me the job and then trusting me with it, even when people told her that was a bad idea.
Go make something awesome. And if you build one, tell me about it. I want to see the cards.
Build Your Own
Bill of Materials
- A phone with a decent camera (I used an iPhone)
- A tablet with a web browser (the operator's screen)
- A Raspberry Pi, with power supply and microSD card
- An inkjet photo printer that supports driverless network printing
- 4x6 photo paper
- A travel router (or any router you control that doesn't need the internet)
- A laptop for setup (a Mac, if you want the easy route to signing the iPhone Shortcut)
Setup Steps
-
Flash the Pi. Use the Raspberry Pi Imager to put Raspberry Pi OS Lite (64-bit) on the card. Choose Lite: the Pi never needs a desktop, and the full version only adds software you'll never use. In the Imager's settings, set a hostname, create your own login, and enable SSH. Boot it and connect it to a network that has internet for now. You need that once, to install packages.
-
Get the code onto the Pi. Clone the repo from https://gitlab.com/calevans/photo-booth on your laptop, then copy it to the Pi. The repo includes a deploy script that does the copy and runs the setup for you in one step.
-
Run the provisioning script. On the Pi, from the repo, run
sudo ./pi/provision.sh. It installs the web server, PHP, and the print system, finds your printer on the network, sets up the print queue, and puts the code in place. It is safe to run more than once. When it finishes, it prints the address your devices should use. -
Join everything to the router. Connect the Pi, the printer, the tablet, and the phone to your private router. The Pi's
photobooth-urlcommand shows its address on each network. The tablet needs nothing installed. Type that address into its browser and you're in. -
Set your look and your secret. The Pi has a config file with the upload token. Make it a long random string. A second, optional file sets the event text, colors, and frame art. Starter looks live in the repo. The frame art is plain SVG, so you can edit it by hand.
You can also hand this step to Claude Code. Open the repo in it and try something like:
Read README.md and docs/DESIGN.md. Set up config/event.php for [your event, who it's for, the mood you want]. Use one of the starter looks in config/events/ as a base, adjust the text, colors, and frame art to fit, and run bin/proof.php so I can see the result.
Tell it the occasion and the feel you want, and it does the rest. Look at the proofs before you print anything.
-
Build the Shortcut. On the laptop, run
php bin/build-shortcut.php <pi-address> <token>. It writes an unsigned Shortcut file. On a Mac, sign it, then AirDrop it to the phone and assign it to the Action button. No Mac? You can rebuild the Shortcut by hand on the phone. Budget some patience. -
Calibrate the colors. Printers differ. The repo has a calibration script that prints a ladder of brightness settings from your own photo. Pick the one that looks right on paper, not on screen, and put the values in the config.
-
Run a dress rehearsal. Take a few photos, press the button, watch them appear on the tablet, type names, and print. When you're done, the Pi has a reset command that archives the test data without deleting it, so you start the party with a clean grid.
-
Plan for the party. Charge the phone, load plenty of paper, and keep an eye on the ink. Expect each print to take a minute or two, and pace the line accordingly.